
Document & Share Philanthropy: A Media Communications Quick Quide
Documenting or requesting documentation for a service project or philanthropy effort may seem like a daunting task, but once you get the hang of the process, it’s not so bad! We promise! In the text that follows, there is a very clear outline if you plan to pursue involving the media at your school or organization. When students and volunteers offer their time, talent, or treasure we create incredible story opportunities that are worth flooding our news with. So take action and get your story heard!
Timeline: TWO WEEKS BEFORE
1. Who do you plan on contacting to share your story?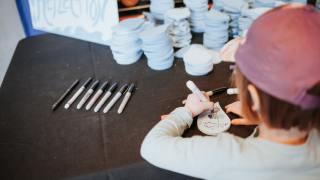
- Internal Organization Communication
- Is there a staff photographer? What data does your school or organization hope to collect?
- Online News
- Are there specific news blogs that feature topics like the event/project you are sharing?
- Newspaper
- What newspapers circulate in your area? Local school newspaper? Business magazine? Nonprofit periodical?
- Television
- Do you know any reporters? Will a television crew disrupt the event you are hosting?
2. Who can you work with?
Know your partners, follow their communication procedures and utilize their resources. Listed below are the general names for the communication departments.
- Public Schools
- Communications and External Affairs
- Nonprofits
- Communications, Marketing, or Community Impact Departments
- Businesses
- Marketing team and/or Owner
3. What are the communication policies?
In general, organizations/institutions want to be aware of any and all communications involving the business, organization, or in the case of schools, the students. They may have valuable connections and resources to assist in promotions. Know the communication policies and follow them to avoid miscommunications and consequences.
For Schools, communication departments need to be informed if media will be attending a school event, especially on the school grounds. Media Release forms are needed to share any image or name of the students and are generally signed at the beginning of the year and apply to all events that the school endorses. The trick is to know which students have signed forms and which ones do not. If they do not, their face cannot be featured in any photo or video.
For Teachers, if you want media to document your event, it will be your job to know which students can and cannot be on video or photographed. Try preparing a list ahead of time. Perhaps bring stickers for students that cannot be photographed so that the media clearly knows.
4. Press Releases
Press releases are used to give a clear and enticing description of the event, initiative, or story. Free templates exist online and are easy to follow. After you write one, double check everything! In general, all press releases include the following information in this order:
- Partner Logo (s)
- Address Location of Event/Project
- Contact Information of who can be contacted for more information (this can be at the end too)
- FOR IMMEDIATE RELEASE and the current date
- Title of event and/or catchy headline
- LOCATION (in bold) followed by a paragraph with the what (is the project) and the why (should they care)
- The following paragraph(s) should have event specifics and/or campaign details of partners
- Lastly, include the names of all the key partners (can be specific names or company names)
5. Press Release Tips (Hubspot)
- Use action verbs, clear, understandable language, and keep it short and sweet.
- Keep in mind that reporters get dozens, if not hundreds, of releases a day so invest the time to write a compelling headline to catch their attention.
- Don’t play hard to get
- For reporters, analysts, influencers, or followers to be inclined to share your announcement you have to tell them upfront why they should care.
- Offer a tempting quotable
- Quoting key figures and authorities underlines the importance of your development.
- Make the “who” and “what” obvious
- Describe what your company does in clear, plain English, include a link to your company's homepage early on.
6. Double Check Everything!
This point is so important it has its own section! After you write the press release, double check the following points:
- Date/Time/Location
- Make sure that partners officially commit to being featured in the press release before including them.
- Logos of partners
- Correct spelling of partners and key people
- Correct spelling and grammar throughout
- Have someone proofread – a project partner or communications team member is ideal
TIMELINE: WEEK OF EVENT
7. Get your story published!
- Look for news sources likely to feature your story
- Send press releases to the news room or communications department
- Reach out to specific journalists (especially if you know them)
- At the end of articles, the author of an article is featured usually with their contact information. If they write about stories similar to your own, that journalist might be interested in your story. Send the press release to them and perhaps try and begin a relationship with them.
- Don’t be afraid to go offline
- Try sending your release through snail mail or another offline channel to differentiate yourself.
- Send the release top journalists the day before
- Give journalists some time to craft a story around your press release by sending it to them -- under embargo -- the day before it officially goes live. (FYI "under embargo" just means they aren't allowed to share the information in the press release until the time you specify.)
- To avoid competition, don’t publish your release on the hour
- Most companies schedule their releases to go out on the hour, which means if your release goes out on the hour too, it's more likely to get lost in the shuffle
- Share your media coverage
- If all goes according to plan, and your press release gets picked up by the media, your job still isn't finished. To keep the buzz going, you can release a "second wave" of distribution by sharing the specific stories that news outlets write based on your press release.
TIMELINE: DAY OF EVENT
8. On-Site Media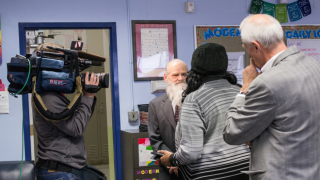
In the case that media does arrive at your event, take these key points into consideration. The better prepared you are in your ability to assist the media, the more fluid the event will take place.
- Check with the hosting organization/institution what their visitor sign-in processes are.
- Set agreed upon time and meeting place for media if possible.
- Inform front desk and all staff of media arrival times.
- Have an event itinerary printed and ready for the media.
- For school events this might be by the minute because of class times and that is ok, being specific best prepares the media (i.e. Key speaker from 11:15-11:40, Assembly Project from 11:42-12:48).
- Be aware of interview locations and event fluidity.
- You don’t want the media to interrupt the event, you want them to witness it! Television crews are very noticeable and often distracting (especially to children), if possible find a way to integrate them into the event without disrupting the event or interrupting a key speaker.
- Interview locations can and should be agreed upon before the event if possible. If the school project is happening in the cafeteria, perhaps the library or hallway are good spots for interviews. Make sure the staff has agreed so they can make necessary arrangements (cleaning/room reservations).
9. Personal Documentation
- Understand what numbers you and your partners want and take note of them during the event!
- Example: # of volunteers, # of students, # of volunteer hours served, # of partners, # of care packages assembled
- Do this during the event so you are not guessing afterwards.
- Take your own photos at the event – so that you have the rights to share the images.
10. Photo Procedures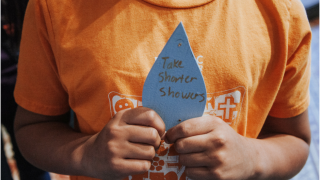
- Media Release forms
- For children: Signed by their parents, usually at the beginning of the school year. Check with school administrators beforehand to know which students have signed forms. If parents will be present at the event it is possible to create a media release form for the specific event and have the parents sign them as you go.
- For adults: Sometimes signed at volunteer orientations, but generally are signed on an event-specific basis. Get your volunteers to sign this form before or at the event for best results.
- No Media Release forms? Try these photos:
- Photographing the back of people’s heads is not considered a violation of rights. So feel free to step to the back of the room and take a picture of a key speaker with the students facing them.
- “Project/Environment shots” are photographs without any people and usually feature a completed project or project in action.
- “Tight Action Shots” are photographs of people’s hands or feet doing something without their face being seen. These images tend to be more exciting than project/environment shots because there is some kind of action.
TIMELINE: AFTER THE EVENT
11. Follow-Up
- Send a second media release with event images and numbers.
- Send event images and numbers to all partners and encourage them to share the information to their connections (social media, newsletter, news partners).
- Share event images and numbers on social media channels.
Guest Blog by Megan Lendman, Grand Rapids Public Schools Service-Learning Coordinator: 2015-17 Michigan Nonprofit Association AmeriCorps VISTA